Sunday, February 19, 2012
This is how it's done.
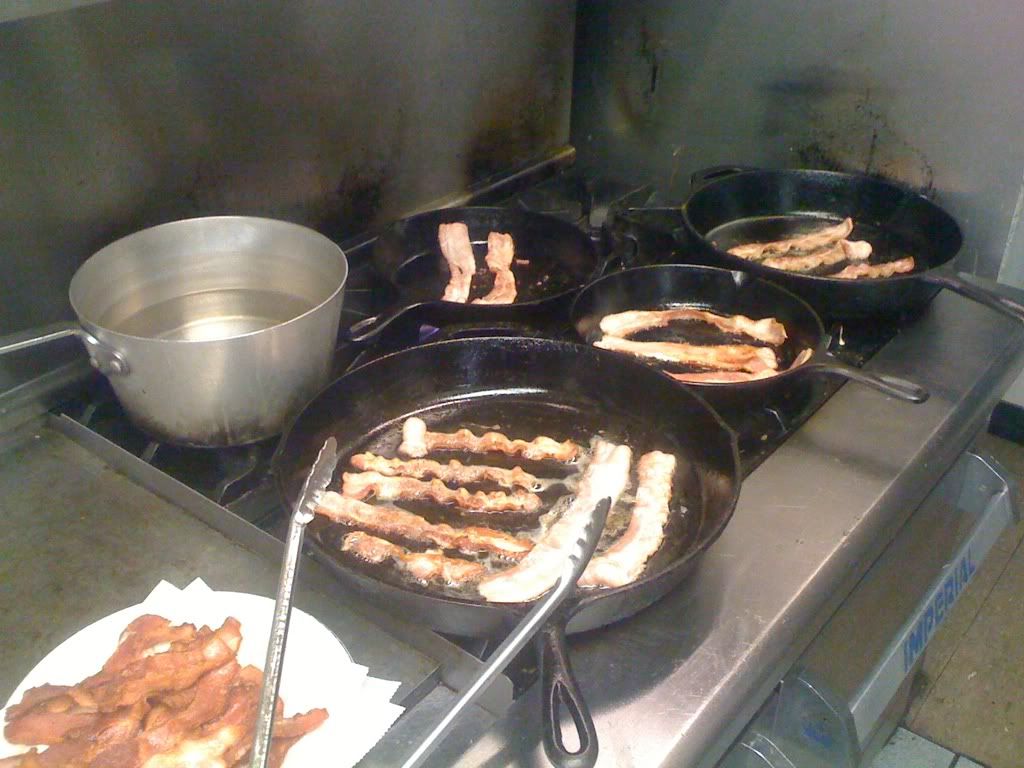
While it's more efficient to cook large batches of bacon on a pan in the oven, it produces a flavor and texture that is entirely different than that of pan-fried bacon. This is a picture of how I did the two pounds of Kroger thick-cut bacon we ate for breakfast at the fire station yesterday. If we'd had any more people eating, I probably would've gone with the sheet pan method. In that past, we've had to feed as many as 23 firemen at once. It takes about four pounds of bacon, along with three dozen eggs, a few pounds of bacon, a giant pot of grits, and roughly 40 biscuits. When you cook that much bacon, full sheet pans are necessary, as are ovens that can hold several of them. In our case, we've got commercial 48" double ovens that can hold a lot of sheet pans at a time. As you can see below, though, I prefer to use the nearly 450 square inches of well-seasoned, Tennessee-made Lodge cast iron.
Thursday, February 16, 2012
Porcine Perennial Perfection.
Also known more colloquially as Bacon Roses.

I, like everyone else on the Internet, saw the bacon rose article on Instructables. Using it as my point of reference, I built on that solid foundation of pork belly boldness. Here's how you can emulate my masterpiece:
Setup
You'll need to gather some supplies. Firstly, and most importantly, you need bacon. There's no such thing as too much, so get lots of it. Variety is the spice of life, so get a few kinds. For my roses, I had three bacons from which to choose: Kroger Hardwood Smoked Thick Cut, Smithfield Naturally Hickory Smoked, and Oscar Mayer Original. I went with the Kroger for most of my roses, with a couple made from the Smithfield. Thicker bacon makes bigger roses that stay bigger. Thinner, floppier bacon is harder to make into a rose, and makes smaller blossoms. There were not a full dozen slices of thick cut, so I was forced to use wimpier bacon to complete my dozen roses. If a baker's dozen is 13, then a bacon's dozen is 11.
Onward. You'll need a mini muffin pan. I got a dozen-sized pan, because it was cheaper than the 24-count, and I was only making a dozen roses. The other plus is that you can use a smaller drain pan under it. The muffin pan fit perfectly on top of a 9x9 cake pan. You'll need aluminum foil to line the cake pan, unless you just really like cleaning grease off of things. Finally, you'll need fake roses. The best ones for this task are the cheapest you can find. The cheaper they are, they easier they come apart, and apart is how they need to get before you can replace fabric flowers with bacon roses. I bought mine at Hobby Lobby for $7.99. To find them there, walk past all the fake flowers in the front. Those are too pricey, and pricey flowers aren't meant to come apart. Walk all the way back to the awful fake flower section. The cheesy, shiny plastic stems and sandpaper-like petals should let you know you've arrived. The roses I got come in a bunch of 13. No, not a dozen. 13. I just cut one off with some side cutters.


3. Roll up your roses. This is where you get to showcase your talent as a bacon florist. Your craftsmanship here will pay huge dividends later on. I found that there is really no "proper" way to roll the rose. It still comes out looking like just a roll of bacon. No other bacon rose article has described this next step, an ancient and closely-kept secret passed down from generation to generation amongst master bacon artisans.


I decided to get my wife something special for Valentine's Day. I mean really special. No mere bundle of severed plant matter would suffice. No confectionary container would suit. Only one heartfelt representation of our love would avail, and that was Bacon Roses.
I, like everyone else on the Internet, saw the bacon rose article on Instructables. Using it as my point of reference, I built on that solid foundation of pork belly boldness. Here's how you can emulate my masterpiece:
Setup
You'll need to gather some supplies. Firstly, and most importantly, you need bacon. There's no such thing as too much, so get lots of it. Variety is the spice of life, so get a few kinds. For my roses, I had three bacons from which to choose: Kroger Hardwood Smoked Thick Cut, Smithfield Naturally Hickory Smoked, and Oscar Mayer Original. I went with the Kroger for most of my roses, with a couple made from the Smithfield. Thicker bacon makes bigger roses that stay bigger. Thinner, floppier bacon is harder to make into a rose, and makes smaller blossoms. There were not a full dozen slices of thick cut, so I was forced to use wimpier bacon to complete my dozen roses. If a baker's dozen is 13, then a bacon's dozen is 11.
Onward. You'll need a mini muffin pan. I got a dozen-sized pan, because it was cheaper than the 24-count, and I was only making a dozen roses. The other plus is that you can use a smaller drain pan under it. The muffin pan fit perfectly on top of a 9x9 cake pan. You'll need aluminum foil to line the cake pan, unless you just really like cleaning grease off of things. Finally, you'll need fake roses. The best ones for this task are the cheapest you can find. The cheaper they are, they easier they come apart, and apart is how they need to get before you can replace fabric flowers with bacon roses. I bought mine at Hobby Lobby for $7.99. To find them there, walk past all the fake flowers in the front. Those are too pricey, and pricey flowers aren't meant to come apart. Walk all the way back to the awful fake flower section. The cheesy, shiny plastic stems and sandpaper-like petals should let you know you've arrived. The roses I got come in a bunch of 13. No, not a dozen. 13. I just cut one off with some side cutters.

So now that you're all set up, let's get to baconing.
1. Preheat the oven to 350 or so. It's not a precise temperature, and you'll have to check on the roses from time to time. Line your drip pan with foil. You're not shielding against government brain waves, so a simple single layer that goes up the sides will do.

2. Poke holes in the bottoms of each muffin cup. You can do this with a drill bit, your incisors, whatever. I used a hammer and a 10-penny finish nail. Put something behind the muffin cups when you do this, do you don't mess up the pan or your garage floor. Scrap wood works well. In hindsight, I wish I'd made bigger or more holes. Or both. The bacon grease did not drain well from the single nail hole. It was easily clogged by globules of pig juice solids. Once holes are poked, place the muffin pan on top of the drain pan.


You put your finger in the hole.
That's right. Get greasy, and stick your finger in the fatty side of the bacon roll. Don't shove it all the way through, just maybe halfway in, and wiggle it around while you're pinching the meaty side closed. You're shaping the rose so that it tapers like an actual unopened rose blossom.

4. Repeat this process for all your roses, and place them fatty side down in the muffin cups. Slide the pans into the oven and bake until desired crispness and doneness are achieved. You may have to grab some tongs and lift the roses out of the muffin cups to allow drainage of the grease. If the holes are clogged, a toothpick might clear them enough to drain. This is why multiple holes or larger holes may be useful.

5. While the bacon is cooking, work on the roses. Start by pulling all the flowers off the stems.

6. Remove the green base of the rose.

7. Open the flower up to find this center portion and remove all the other petals. You'll be left with just a center section.


8. Remove the outside "cage" from this center portion. You can then remove the rest of the petals, leaving only the very center of the rose.


9. Push the center post out through the white portion. Throw away the white part. Then reassemble all the green parts the way they used to be, but now without silly fake flower petals in the way.


10. Now that you've got the base of the flower back together, shove it back down over the stem. You want to push the stem up through the flower base such that the stem is about even with the points of the base (about an inch or so). You can slide the other elements of the bouquet, like leaves and baby's breath, down the stems to make room.

11. Check your bacon roses. You might have to flip them over in the pan to cook the bottoms completely. I recommend cooking the roses on a lower rack of the oven, closer to the heating element or flame. This will aid in cooking the bottoms a little more. You're working against a sort of insulated bottom with the two pans and aluminum foil. The tops of the roses will cook faster if you don't do something to counter this a little. When the roses are done, pull them out and let them drain some grease, or you'll end up with greasy flower stems and everything else.


12. Once cooled and degreased a little, just arrange your bacon buds on the flower bases. The weight of the roses will likely pull the flimsy stems all over the place. The best way to combat this is to rubber band or tie them together as close to the top of the bouquet as possible. I had to bend the bottom of the bouquet up and shove the bouquet deep into the vase to support the stems enough to hold up the bacon. Fill the vase with whatever you like. All those rose petals you pulled off earlier do fine if you don't have fancy glass beads or anything.


And that, my friends, is how a real man does Valentine's Day for a real woman.
Tuesday, January 10, 2012
Friends Don't Let Friends Eat Baconnaise.
I said in my first post that I might review J&D's Baconnaise. Here's my review: it's horrible. It's not worth doing an in-depth review with pictures and all that. It's just not good stuff.
I've had a jar of Baconnaise since Christmas, and I've been trying to work up the courage to crack it open and give it a shot. I tried it on a turkey sandwich. Simple, right? Seemed like the best way to start off with the stuff. At first taste, it hits you with a fake meat flavor reminiscent of Liquid Smoke and peppered beef jerky, but not in a good way. There's no bacon or mayonnaise taste to it at all. It doesn't even taste like Miracle Whip, which is actually a salad dressing. It just tastes yucky. I couldn't even swallow my first bite. I spit it out and threw away the sandwich.
I still have two packets of J&D's Bacon Ranch mix. I'm not sure how I'll even go about testing them. I'm even less sure if I want to at this point.
I think the problem is that the J&D's products are completely vegetarian and Kosher. That means that they have no actual bacon in them. I'm not sure how you get a bacon flavor without real bacon, but judging by Baconnaise, you probably don't.
Thursday, December 29, 2011
Let the baconification begin.
I've started this blog as a personal quest for porcine perfection. I'll be reviewing various bacon offerings, as well as other bacon-related products. I'll try to stick to food items, but I can't promise that there won't be bacon candle or bacon deoderant testing. That's right, Baconnaise, I'm coming for you. We might even get to exotic bacons, like pancetta.
For the bacon purists, don't worry. I will be reviewing the bacons on their own merits, without the hindrance of unnecessary impurities like salad, chicken, or lettuce and tomato. Pure, unadulterated BACON. We'll test each bacon in good ol' American cast iron and in the oven.
The pace of the reviews will be limited by time, money, and appetite. Though, I've never found myself too full for bacon. Since I don't have any tasty bacon at the moment, I'll leave you with bacon comedy. Welcome to The Baconnoisseur. Happy baconing.
Subscribe to:
Posts (Atom)